ONTRAPORT is one of the best marketing automation tools available on the market.
Scratch that! With the introduction of the new Visual Campaign Builder ONTRAPORT is now THE BEST BUSINESS AUTOMATION TOOL out there.
And this is not an overstatement, believe me.
What is a visual campaign builder?
To put is short, the ONTRAPORT Visual Campaign Builder allows you to build your whole campaign in one place now – from the opt-in to the sale and the follow up after the sale. Just as you would map the interactions on a flowchart software like Lucidchart, the campaign builder includes all elements.
How is ONTRAPORT Visual Campaign Builder different than all other on the market?
This was the most requested feature from ONTRAPORT users for years and the wait was worth it. If you’ve seen tools like Infusionsoft, Drip or ActiveCampaign, you already know the benefits. But ONTRAPORT didn’t just copy an existing solution and called it a day. They created the best visual builder on the market and it would take years for all the other tools to catch up.
Here are the main reasons why the ONTRAPORT Visual Campaign Builder is better than all the others:
- The tools doesn’t just have one interaction line. You can have different entry points and different email sequences under the same roof. You can have your freebie delivery, your sales sequence, the cart abandonment emails and the product delivery – all on the same page.
- One contact can be at multiple points in the same time. They don’t (need to) restart the campaign if they opt-in for your freebie again. If they fill in a second form for another freebie in the campaign, or a contact request – they stay on the right path. And you can decide what that path is.
- Performance mode – the reporting tool inside of the campaign builder is one of a kind. It shows different types of data like conversion rate, funnel info, your ad-generated lead’s results and so much more.
Now, you might say that this was just introduced on June 5th, but we as Ontraport Certified Consultants had access to the builder for 6 weeks before it was shown to the public. Meaning we had time to play, recreate our existing campaigns, enjoy and be wowed! This is an informed post based on our personal experience and understanding of how this changes everything.
In this post we will go through the main features in short. We’ll have more detailed posts on that at a later point.
The Visual Builder
The builder is here to take out frustration and put all your elements on the same page. This means that you won’t need to create different sequences anymore and keep a good naming convention in place so you don’t forget which campaign they belong to.
It works quite fast and allows you to add your elements one by one – leaving it up to you whether you want to edit the settings immediately or just build your dream campaign first. Keep in mind that with the new setup you won’t have to add contacts to a campaign in order for them to start it. A campaign will trigger based on the conditions you applied in there.
Entry Points and Triggers
Let me start with the triggers – how you add contacts to a campaign. If you’re already an ONTRAPORT user, triggers are like the Global Rules in the system. They keep an eye on every interaction and are fired when the right trigger is met. A campaign can have as many triggers as you want – or as I prefer to call them – entry points.
Apart from the standard rule triggers you’re used to, there is a number of new ones introduced. For example, a form submission is now a trigger.
The difference between a rule and a trigger is that the third element is lost – the Action that needs to happen is added as a visual element right underneath the trigger. This allows you to see why something is happening and what follows next.
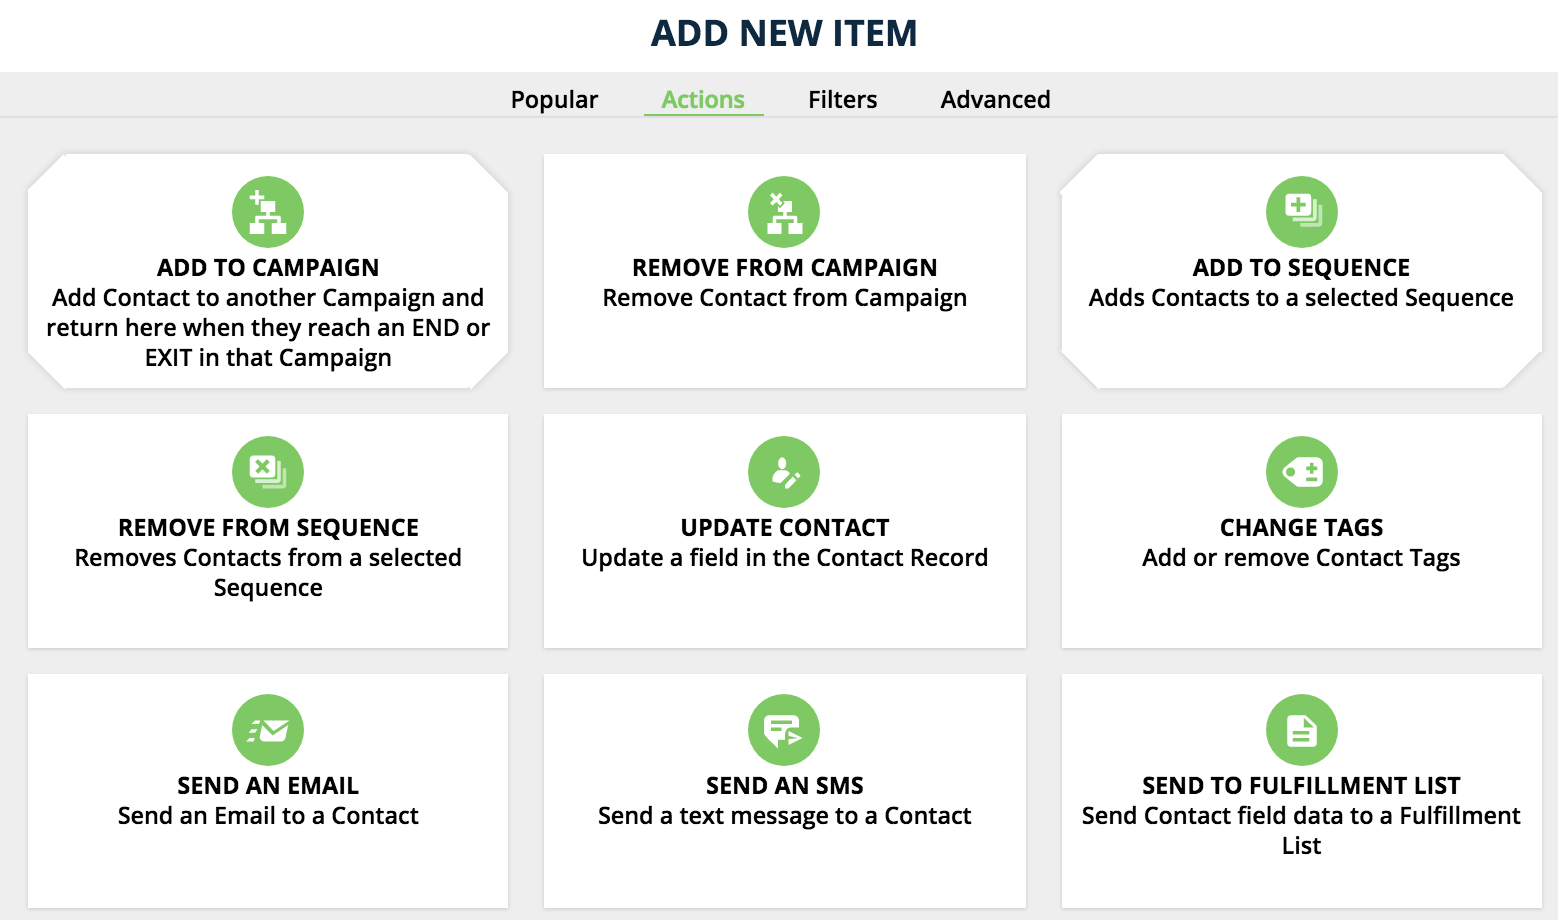
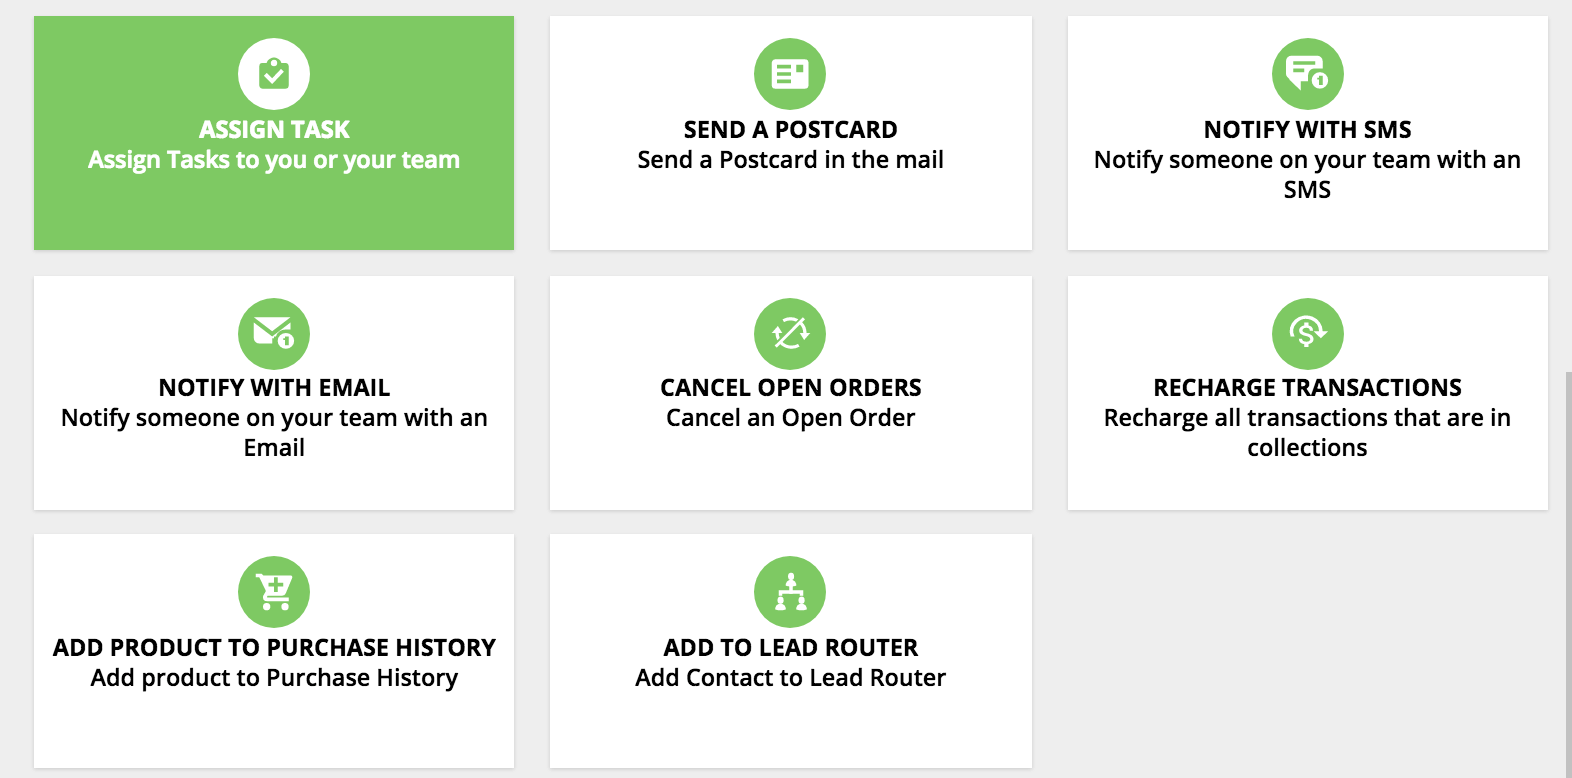
Actions
Once a campaign stream is triggered, something needs to happen. You have a list of the following actions to select from. They cover everything you might need to do with a contact and make it easier for you to follow.
Keep in mind that the new color scheme means that elements of the same time have the same color. Actions are green, filters are blue or red, and advanced elements are also blue. Before messages were red, tasks – green, rules – orange, postcards and SMS – purple.
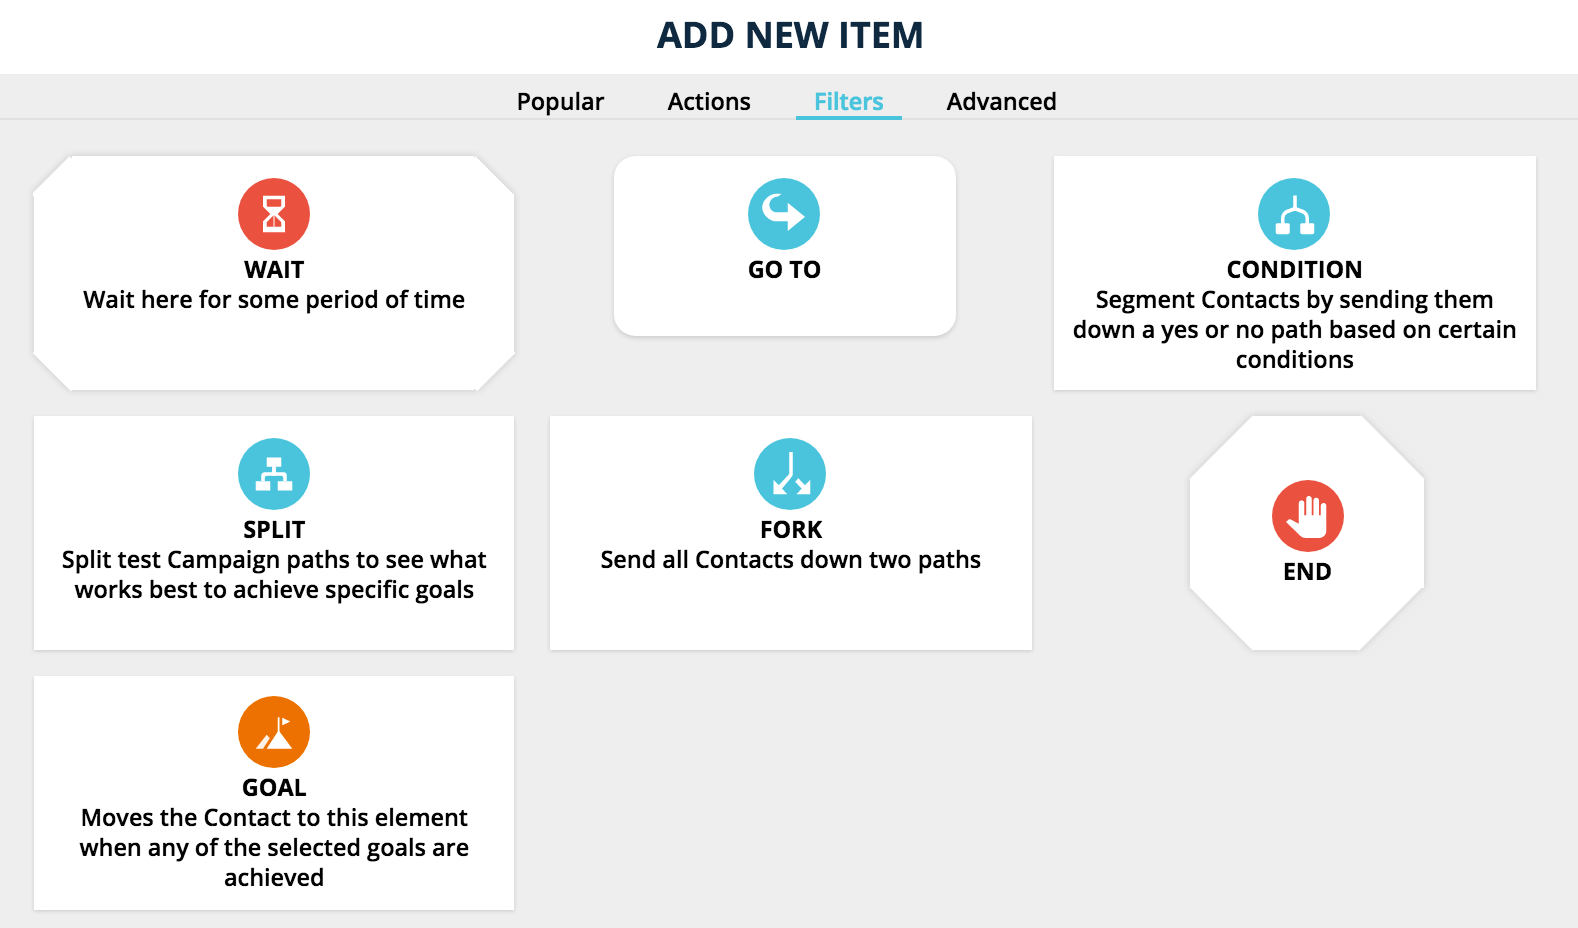
Filters
Filters include some exciting new elements that you’ll love.
I want to focus on the SPLIT and FORK filters as they work in a new way that is important to understand.
The Split filter would allow you to split test a part of the campaign – element, postcard, sequence, etc. But it doesn’t need to be 50-50 now or any equal percentage. You can choose to send 90% of your leads one way, and the next 10% – another. That’s something we’ve all been very excited to try.
The Fork filter is the one that you might confuse with the Split in the beginning. Essentially, the Split does what it says for one step of the campaign and then puts the contacts back on the same stream. On the other hand, the Fork will create 2 separate streams and won’t connect them unless you say so specifically. The fork is useful when you want to split your leads to go through 2 different sequences and then compare results. The Split is great for one element you need tested and then putting people on the same step again.
Now let me tell you about your new best friend – the Goal element. This little box turns your campaigns into more than just a pretty outline. Every important action that you need to track needs to be assigned a goal. Goals are used in the Performance mode to show you stats and information related to them. That being said – don’t overuse goals just yet.
Advanced Elements
You might not need any of this elements at the moment, so the team put them away to make it easier for you to manage your campaigns. Just keep in mind that the Facebook Custom Audience connection is here, as well as the membership access management. 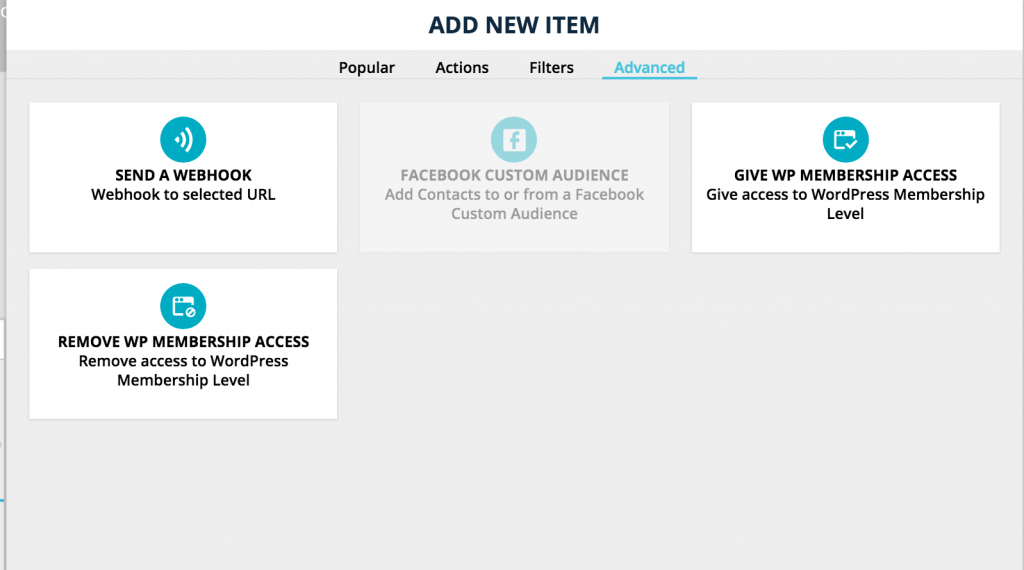

Publishing a campaign
One of the most dreaded mistakes people make with their marketing automation software is publishing campaigns that are not ready yet. ONTRAPORT added a security measure for you in order to minimize errors. When you start building the outline of your campaign, you might not want to edit the settings of each element then and there. If you don’t edit an element, you’ll see a small red dot at the left top corner. This shows you that there is still something to be done there.
But let’s push it one step further – until you remove all red dots, you can’t publish a campaign.
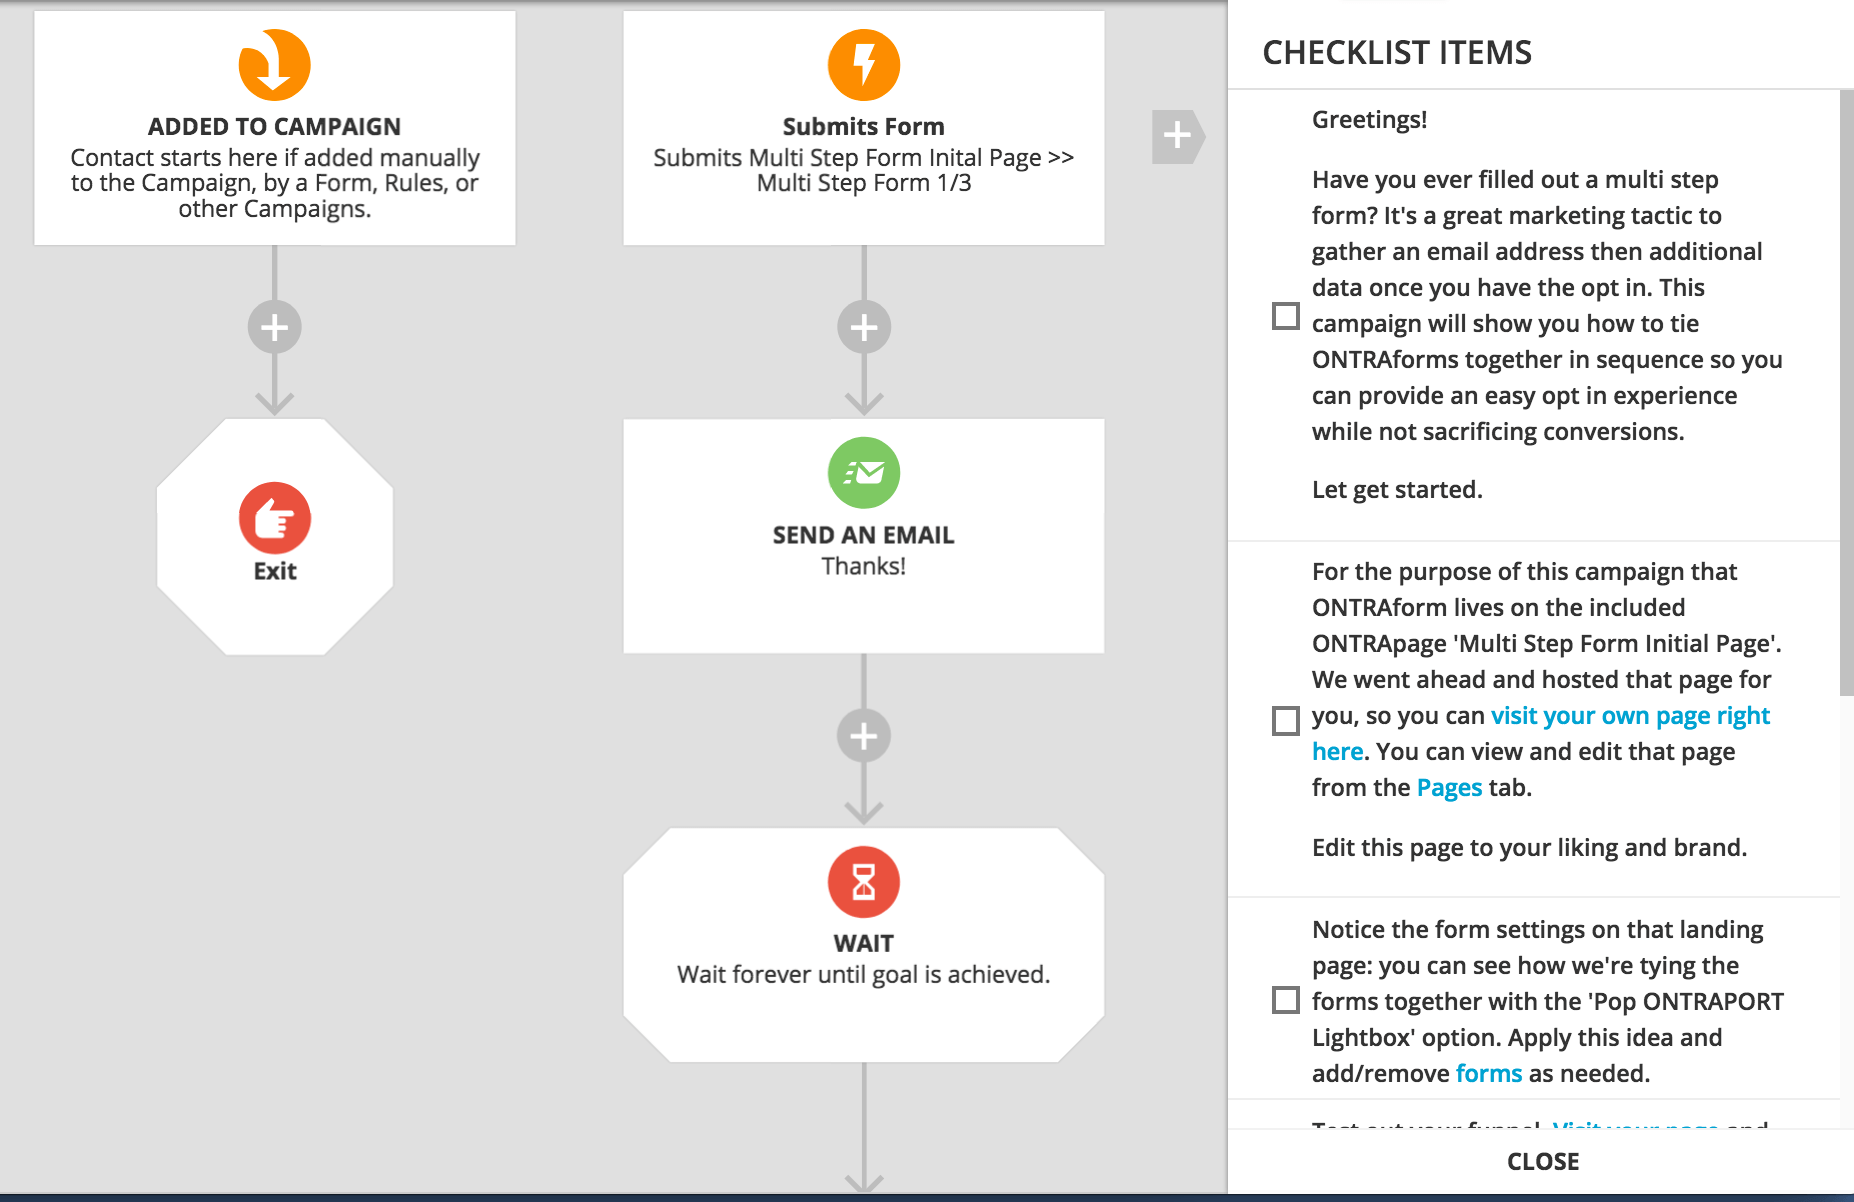
Notes to campaigns
There are a lot of times when you just need to add a line in an email but you keep forgetting about it. With the new Campaign Notes you can add a checklist for yourself with the things that need creating, editing or fixing. As with the red dots, until the checklist is completed you can’t publish a campaign and run it. The extra safety here is combined with useful notes to your team or yourself. I love this feature!
Sharing a campaign
Maybe you know that ONTRAPAGES can be shared with other users. Maybe you know that ONTRAPORT Certified Consultants can share pre-built elements with you – emails, forms, fields, sequences. Now you can share pre-built campaigns within accounts with a little twist – you don’t need to actually share your field, tags, emails, SMS, tags, etc. You can just share the Campaign outline with any other user and they can choose to load the content or not.
If you want to see how that works, just select one of the pre-loaded example campaigns provided by the team and play with it.
Performance Mode
Performance mode is where you’ll find the in-depth reports that you need to know how your campaign is performing. This makes ONTRAPORT’s visual campaign builder one of a kind. As I said before – you can have your whole flow on one page. And you can now see your whole stats there too.
There are 6 reports in the system and I’ll quickly go through all of them now. The performance mode and tracking deserve a more detailed review for the next time.
Contact Flow
Here you can see how contacts have moved through your map over time and where contacts are now. This report can help you identify the weak spots in your system and understand how to optimize it.
Funnel Conversion
‘how effectively am I moving contacts through my funnel as a series of goals. You need to select a trigger to display it…. then data is displayed on the goal and wait elements only, and each number is the percentage of contacts who achieved that goal and also achieved the previous upstream goal or trigger.
Lifetime Value
Each node is simply going to display the total of the ‘Spent’ field for all the contacts that have hit that element.
The next 3 reports in the system are specifically connected to a single goal so you have to select the goal that you want to see information about in order to display the report. Remember when I said that goal are important?
Goal Conversion Rate
This report will show you for every element on the map the likelihood that a contact who hit that element will eventually also achieve the selected goal.
Goal Conversion Time
after you’ve selected a goal to report on, the rest of the elements on the page will tell you how long, on average, it takes for a contact to get from that element to your selected goal.
Goal Conversion Point
Once you’ve selected a goal to report on, all the other elements will show you how many contacts were sitting at that element WHEN the selected goal was achieved (and what percentage of the total that is.) This will essentially show you which of your messages resonated best with the audience and attribute the conversion to it.
Summary
If you’re an ONTRAPORT user or ever considered using the tool, this is the time to jump on and start your free trial or connect with me – a certified Ontraport consultant.
Is this a game changer or what?